Automate Your Repo Listings with HubSpot
I got a peek into the process that my client was following to manage the repo listings on the credit union website. They were manually adding all the detail and then manually adding each photo to the page (resizing, aligning to a grid, and repeat) for every single vehicle. So I built them something better. It saves them time, which is money, which is rent, which is shelter. You get me.
And it was honestly easier than I expected.
I very much believe in the cooperative model, so I thought this could be a helpful system to share with my peers. So, here's how it works, and why other credit unions on HubSpot should know this kind of thing is possible.
What are we solving?
For many hyper-local credit unions, posting repos on the website is a recurring manual task that nobody loves. Someone has to log in to the CMS, upload photos, enter details, format the page, and then remember to remove the listing when the vehicle sells and reformat, etc. If that process breaks down — and it will — your repo manager is the one who notices. I've been there.
The good news: if you're on HubSpot, you can automate this and even provide metrics.
The New Experience
Imagine a world where…
Any staff can take photos of the vehicle with their phone, complete the Google Form from their phone, and be done. The listing will be added in seconds.
Someone sees the vehicle and wants to make an offer. They click “Make an Offer” and fill out a short form that notifies staff for instant connection.
Staff sells the vehicle, moves the listing to Sold, and it’s gone from the website.
How the System Works
1. Build the custom object and its properties in HubSpot
Before anything else, you need a custom object configured in HubSpot to represent your repo vehicles. This is where you define the fields that will hold each vehicle's data — VIN (unique id), vehicle type, price, mileage, color, branch location, and any other detail field. The object also gets its own pipeline so staff can manage the listing lifecycle from a board view in HubSpot, just like a deal pipeline. My stages were: Listed, Recently Marked Down, Offer Received, Sold, Removed.
2. Set up intake via Google Form
HubSpot's native forms don't support photo uploads to CRM properties, so we use a Google Form instead. Staff enter vehicle details and attach photos from their phone or computer. That's the entire staff-facing intake process — no HubSpot login required on their end.
3. Create a HubSpot private app to authorize the connection
Because the Google Form (and its Sheet) lives outside HubSpot, you need a way to authorize data to flow in. In HubSpot, you create a private app and grant it the appropriate scopes — CRM object read and write, Files read and write, and pipeline read. The private app generates an API token that the Apps Script uses to authenticate every request. The connection is encrypted in transit, and the data being transmitted — vehicle details, VINs, photos — is the same information you're about to publish publicly on your website anyway.
4. Build the Google Apps Script
A Google Apps Script reads each form submission and does two things: uploads the photos to HubSpot's Files Manager in a folder named for that vehicle's VIN, and creates a new vehicle record in HubSpot CRM with all properties populated. Once it's set up and deployed as a web app, it runs automatically on every form submission with no ongoing maintenance.
5. The custom HubSpot module does the heavy lifting
This is the heart of the system — a custom module built in HubSpot's Design Manager that makes the listing page fully dynamic. I don’t have time to dive into making a custom module here, but it does take some technical mumbo jumbo, so reach out to me if you need help.
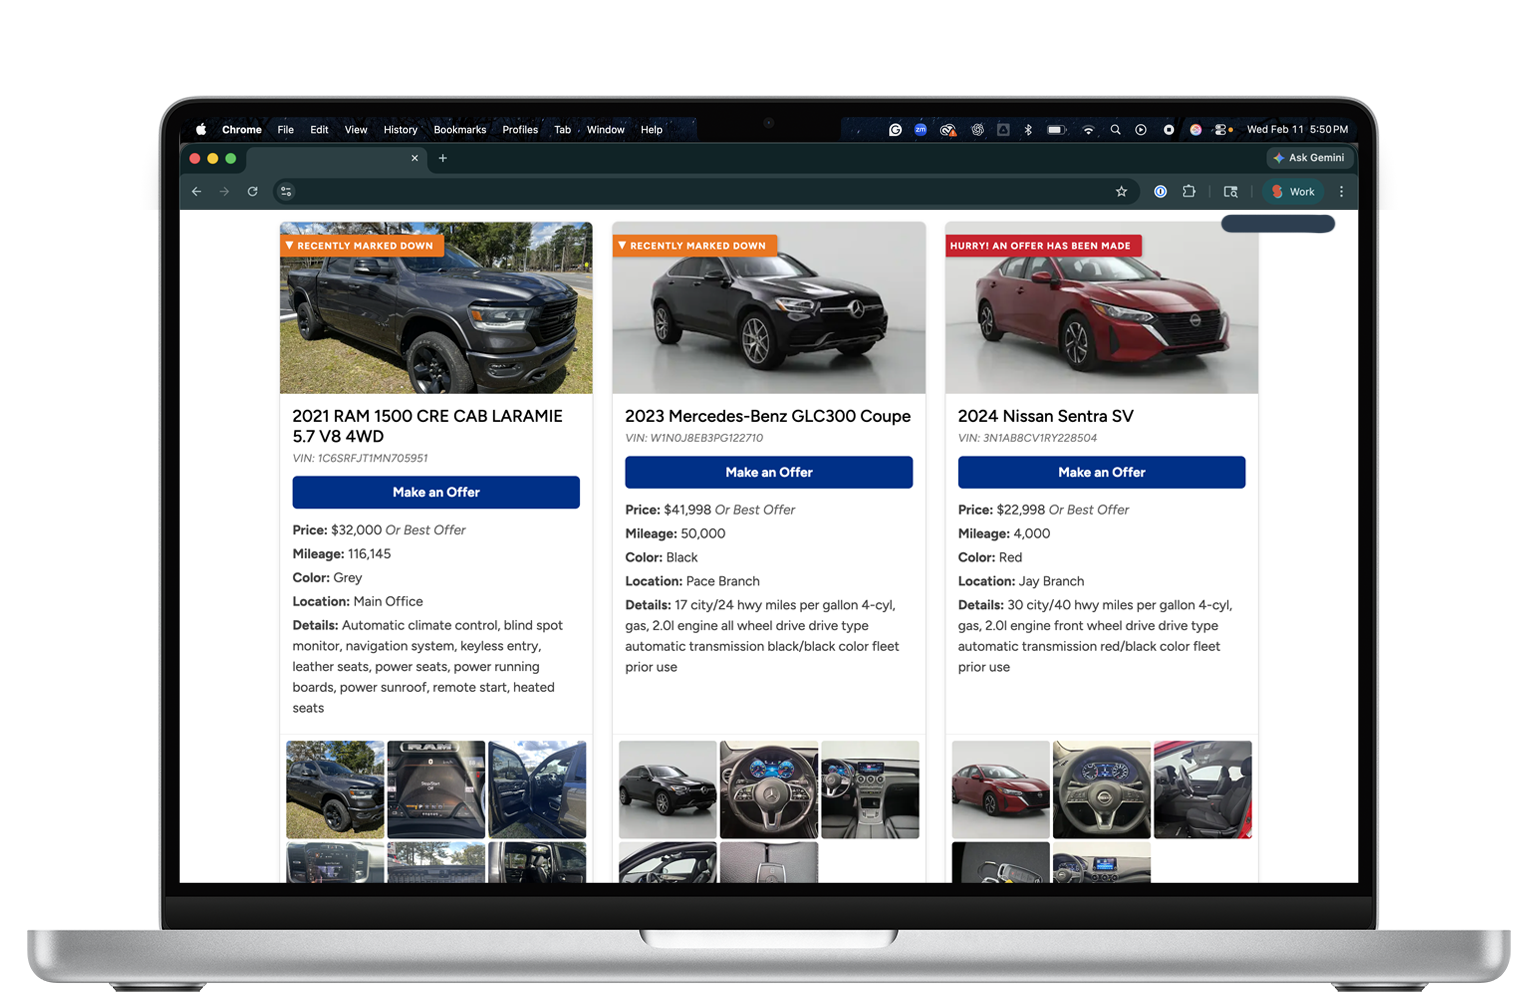
Instead of static content that someone has to edit every time a vehicle comes in or sells, the module contains a live query that reaches directly into your HubSpot CRM and asks: what repo vehicles are currently listed? Every time the page loads, it gets a fresh answer.
The module renders everything the visitor sees — vehicle photos, details, price, mileage, and a Make an Offer button — for every active listing, automatically. It also reads the pipeline stage of each record and displays status ribbons accordingly: an orange ribbon when a price has been reduced, a red ribbon when an offer has already been made, both there to let visitors know they may need to act quickly. When a visitor submits an offer form (you could build an entirely different pipeline for those leads), the record moves to Offer Received in the pipeline automatically and that ribbon appears on the listing. When a vehicle is marked Sold, it's gone on the next page load.
This does require working knowledge of HubSpot's Design Manager templating to build correctly, but once it's in place, the page stays current without anyone having to touch it.
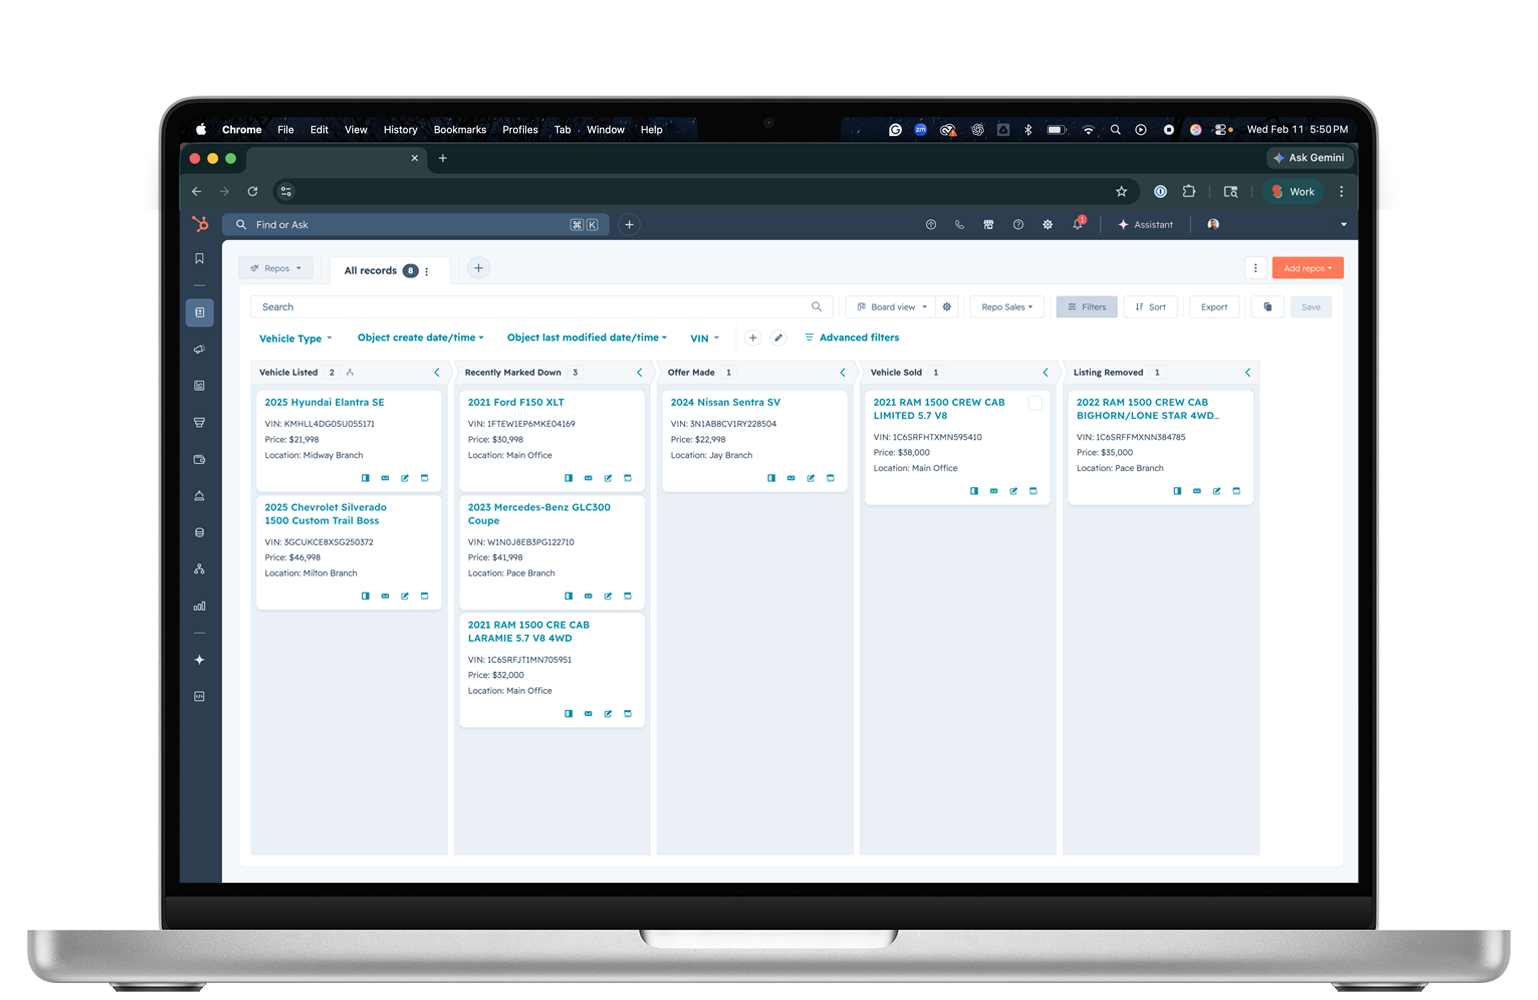
6. Manage the vehicle lifecycle through the pipeline
From this point forward, your repo listings can be managed with a simple drag and drop between stages — Listed, Recently Marked Down, Offer Received, Sold, Removed — on the Repo Pipeline. Any change to their pipeline stage will trigger the custom module to do everything it needs for you — which records appear on the page, which ribbons show, and when a listing should be removed.
What You Need
A HubSpot website page or landing page — required. The listing page must be built in HubSpot's CMS using Content Hub Professional or Enterprise, which gives you access to HubL templating and live CRM queries inside custom modules.
A custom object and pipeline — If you need both of those, I recommend Sales Enterprise, which starts at $150/month and includes access to custom objects and a bajillion pipelines. But if you just need an additional pipeline and already have access to custom objects, Sales Starter or Pro gets you more pipelines.
A HubSpot private app — required for the Apps Script to communicate with HubSpot securely. Setup takes about ten minutes inside your portal.
Google Forms and Apps Script — Free. Handles the photo upload gap that HubSpot doesn't cover natively.
A HubSpot partner — If you work with one, like Substation Marketing, this is a 1–2 day project.
It's Not Just for Repos
This same custom module pattern works for career pages, event listings, contests, employee of the month tracking — most things maintained by hand on a webpage. If the content changes regularly and someone is doing it manually, this architecture is worth a conversation.
Reach out if you want to talk through whether ideas like this makes sense for your credit union.